I was on vacation this week. Actually a staycation.. but none the less anytime at home, without the commute and headaches of work is definitely a VACATION. So I did quite a bit of sewing (of course - duh!) and some entertaining and some general relaxing. In fact, right now I am sitting on the deck with a bottle, I mean a glass - LOL, of wine. My last hurrah before work and reality hits tomorrow. It is a gorgeous late summer day here.

One of the projects I worked on and finished this week was a table runner from the Liberated Star blocks I have been making. I grabbed 5 blocks, sewed them together and added a piano key type border to each of the long sides.
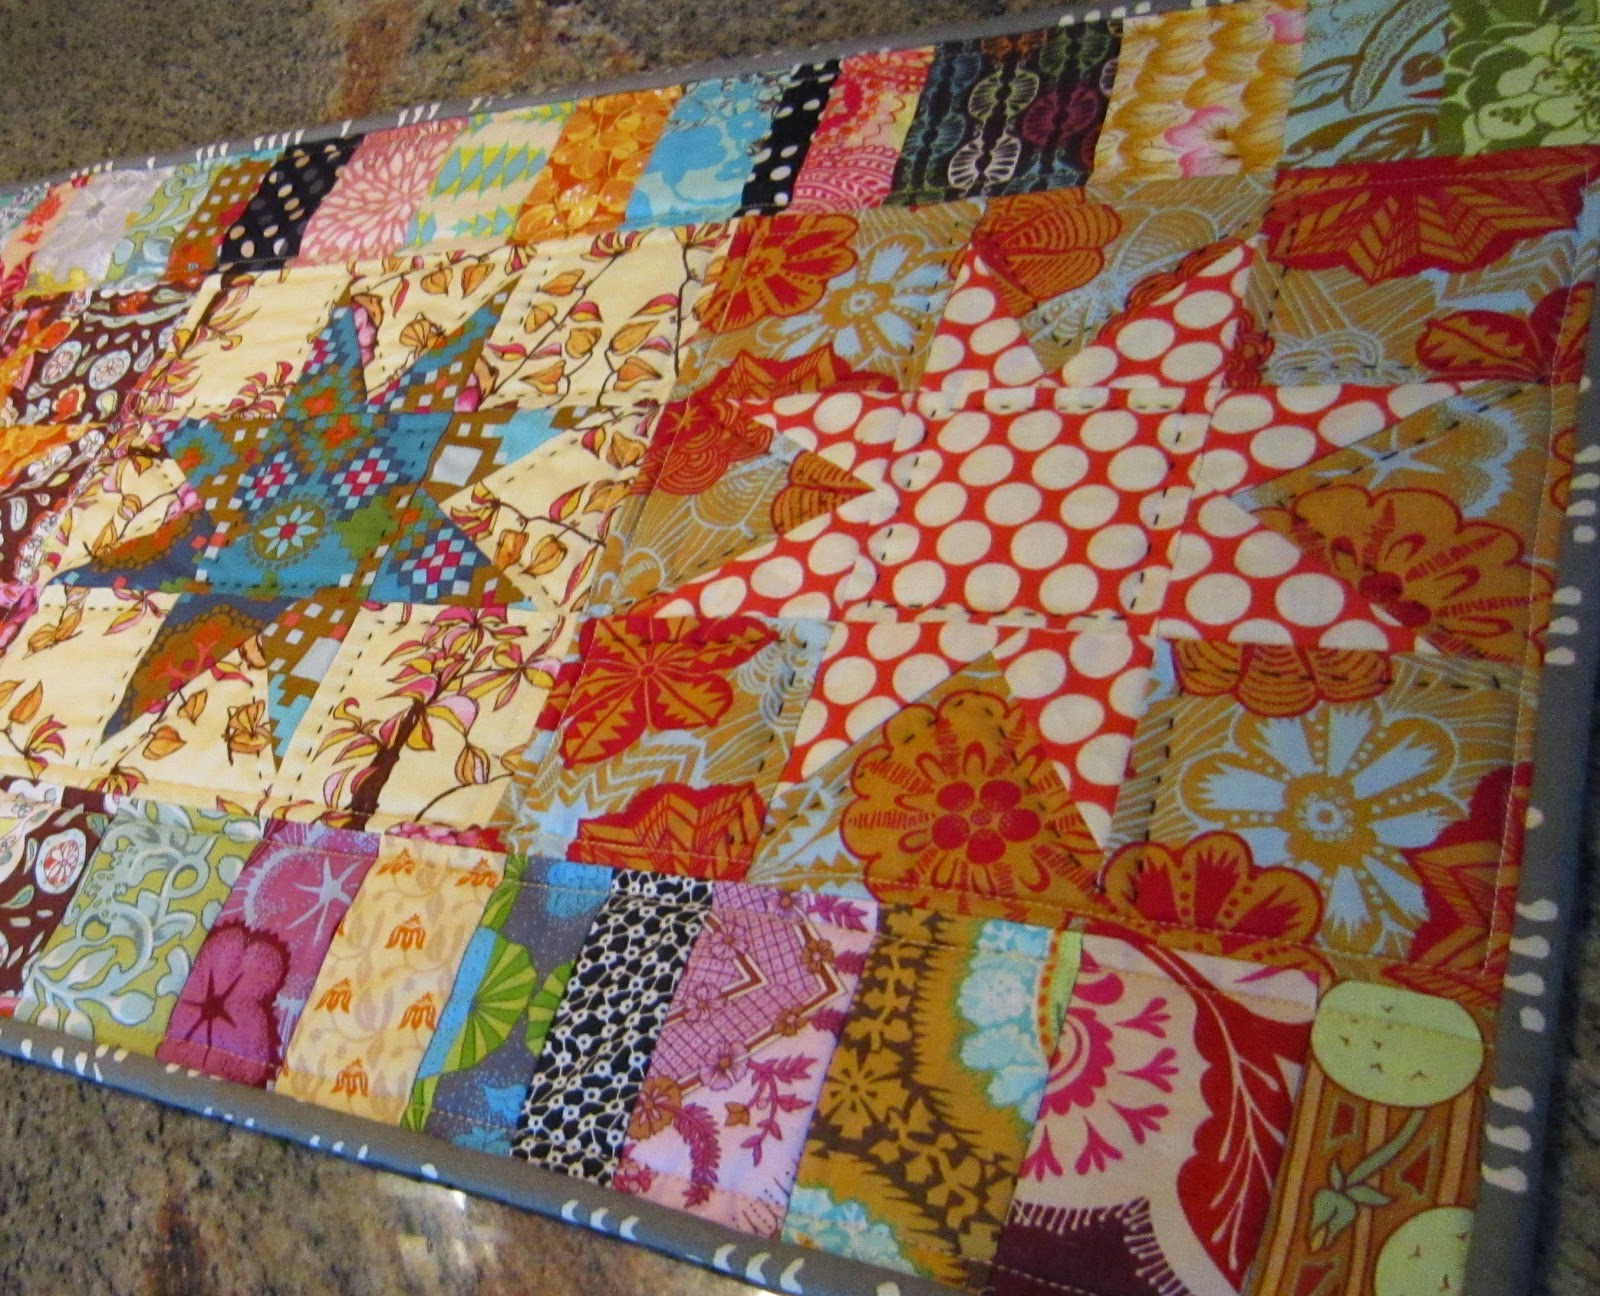
I machine quilted around each block and then big-stitch hand quilted in black cotton around each star and in the center. I love the colors and motion that all these fabrics create when they come together.
A couple of people have asked about these blocks... so here we go - a quick (I hope) tutorial on how they are made.

My blocks are 9" finished. So to start, I need to cut 8) 3 1/2" squares for my background (the blue fabric pictured here), and 4) 4" squares, cut in half to make 8 triangles (the red print fabric). I also need 1) 3 1/2" square out of the red fabric for the star center.

Now, here is the fun and liberating part. Put that triangle at an angle across one of the background fabric squares. Sew with a 1/4" seam allowance from the edge of the triangle.

Trim away the excess fabric from the corner of the square. Press the triangle toward the seam allowance.

Add the second triangle on the opposite side of the background square, again using a 1/4" seam allowance. No matching seams, no right or wrong angle or placement. Liberating! I usually string piece these and do the blocks "assembly line style".

Star production line! It goes really fast.


Again, trim and press.

Now I need to trim my blocks down to 3 1/2" square.

With the blocks trimmed, I can now start sewing them into rows with the other 3 1/2" square blocks that I originally cut.

The rows go together easily using a 1/4" seam allowance. Next, I sew the rows together!

My Liberated Star block is complete! See how the points of the star vary.

Before I know it, my star block is joined by the other star blocks I was working on! It's a small constellation! LOL Can you imagine how fun these would be in pastels or brights for a baby?

You can vary the size - as you can see with the 6" stars I did just for fun!
These were done with 2 1/2" background squares and 3" squares cut diagonally into triangles.
They are addictive!! Right now I am up to 48 blocks!! I think I need a quilters intervention!
Happy Stitching!
Deb

Great fabrics and stars, especially like the way you have added the piano key border.
ReplyDeleteThanks.. at first I thought the borders were too busy for the block.. but I have grown to really like them. Thanks for stopping by.
DeleteGreat table runner, beautiful colours together, thank you for showing your tutorial!
ReplyDeletegroetjes van Marijke
Glad you liked the runner and the tutorial. Hope you get to make some of these great stars!
DeleteNow those are awesome stars! I'm going to try out your tutorial.
ReplyDeleteThanks! I LOVE these stars. I would love to know how you made out with the tutorial and what your stars look like!
DeleteNifty stars!
ReplyDeleteThanks! And thanks for stopping by. They sure are fun!
DeleteLove your fabrics!!!!! Awesome finish!
ReplyDeleteVal, these fabrics are new to me. Trying to branch out to something different. I think they are really exciting and the runner is fun to look at everytime I walk into my kitchen!
DeleteThese are super fun! I love how your table runner came out. That hand stitching really makes it pop. And thanks for the quick tutorial on the blocks.
ReplyDeleteThey are super fun and addictive! The big-stitch really seems to be a good match to the busy fabrics. Hope you get to try the tutorial.
DeleteDeb I LOVE the mixes of color and pattern and how all the fabrics look so great together in your table runner! What a beauty!
ReplyDeleteThanks! These are new fabrics for me. Trying something new and wanted to really go crazy with the fabrics and colors. It is good to work outside out comfort zone!
DeleteYour table runner and tutorial are fabulous, Debra! The photos are bright and beautiful! Intervention??? Nah!
ReplyDeleteThanks, Lorna. The table runner really makes me smile everytime I look at it! Thanks for the comments on the blog. The stars are so much fun!
DeleteI am a fan of the liberated and love how you've done these with such a great mix of color and pattern.
ReplyDeleteLaney, these are new fabrics for me. I am trying to work with some new patterns and colors. I am glad stepping out of my comfort zone was such a success and that you like the result. Liberated Quiltmaking is awesome!
DeleteHow fun and "liberating"!!! Loved your tutorial - now I want to go make some of these cute and easy blocks!
ReplyDeleteTeresa - you so NEED to make some of these blocks! Would love to see how you like the tutorial and your stars!
DeleteWhat a wonderful quilt. I love Stars and these look great.
ReplyDeleteBonjour, Il like very mmuch the blue background.... Can you tell me what is the reference. Excuse my bad english, I am french.....
ReplyDeleteTank you. helenezannier@sfr.fr
Great Colors! Visiting from Val's.
ReplyDelete